While you are planning to migrate from PST to Exchange Online, this post will help you convert or migrate MS Outlook PST to Office 365 Cloud Mailbox.
Here I am going to discuss two possible ways which are the Manual process or a third- party application with these methods you can easily import you all PST data like emails, contacts, calendars, appointments, and attachments etc into the o365 Cloud Platform.
Method 1: Export PST into Outlook 365 manually
If you want to use the manual process for converting the PST files data into Exchange Online then follow all step by step instructions.
Step 1: Firstly, you need to add the Mailbox Import Export option on the Organization Management list. For this, you can also use the GUI based step or the PowerShell command. Here I prefer to use the PowerShell command just because it is not much complicated like GUI steps.
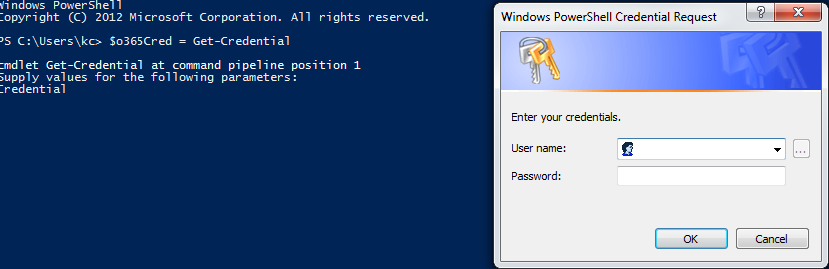
So now open the Windows PowerShell and type the following commands:
$o365Cred = Get-Credential
$Session = New-PSSession -ConfigurationName Microsoft.Exchange -ConnectionUri https://ps.outlook.com/powershell/ -Credential $o365Cred -Authentication Basic –AllowRedirection
Now press the Enter key, once you hit on Enter you will see a popup will appear on the serene then put the Office 365 Admin account and Password>> Ok.
Import-PSSession $Session
After type, this command just hit the Enter.

New-ManagementRoleAssignment -Role "Mailbox Import Export" -SecurityGroup "Organization Management" -Name "Import Export Org Management"

New-ManagementRoleAssignment –Role "Mailbox Import Export" –User "user name"
Note: In the user name section you need to provide the valid user name.

Step 2: After adding the Mailbox Import Export option. You need to log in your Office 365 mailbox account and go to Import window by clicking Admin Center >> Security & Compliance then select the Data Governance option and after that Import.
Step 3: Once the window will open then click the New Import Job, after that type the job name >> Next>> Next.
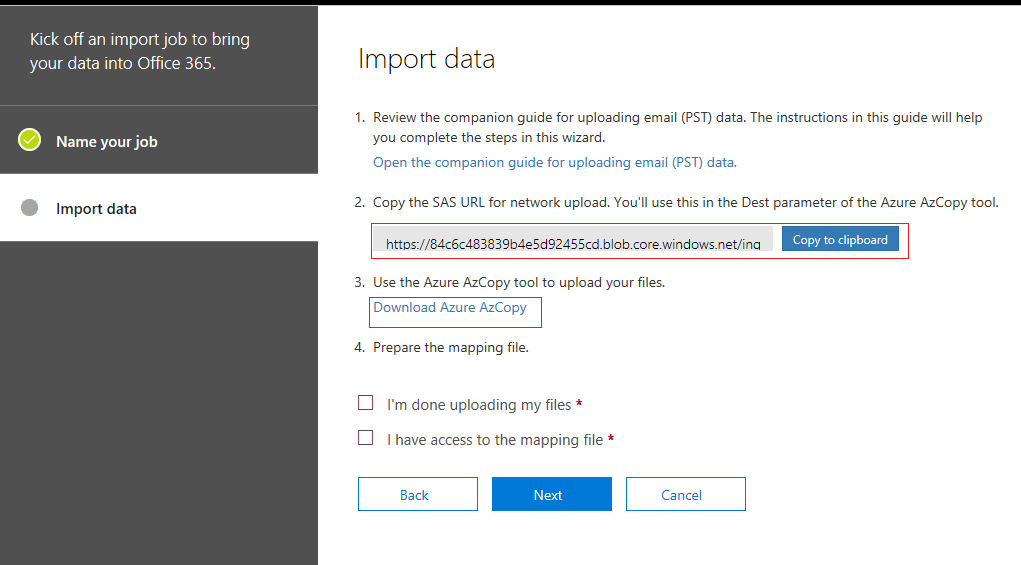
Step 4: Now a new window will appear on the screen, here you need to click the Show Network SAS URL>> copy to clipboard (to copy the SAS URL) and then download the Azure tool by clicking Download Azure AzCopy.
Step 5: Once its download just installs and lunch it and type the given command:
“AzCopy.exe /Source:\\PST file location path/Dest:”SAS URL” /V: location to save log file \AzCopy.log /Y”
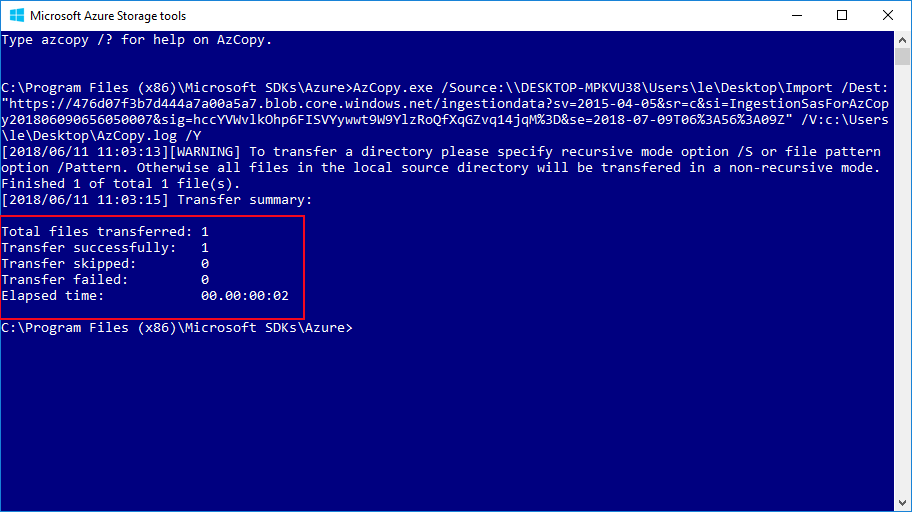
PST file location: That file path where your PST is saved and you gave the sharing permission of it.
SAS URL: That URL which you copied by clicking the copy to clipboard.
Location to save log file: That location where you want to save the log file.
Step 6: Once it has done, create the CSV file for uploading the Mapping job.
Note: you can enter the multiple PST file for importing PST into o365.
| Workload | FilePath | Name | Mailbox | IsArchive | TargetRootFolder |
| Exchange | Provide a shared file path | Pankaj.dohre.pst | [email protected] | FALSE |
Step 7: Now back to the Import data window and check on preparing the mapping file’s options >> Next.
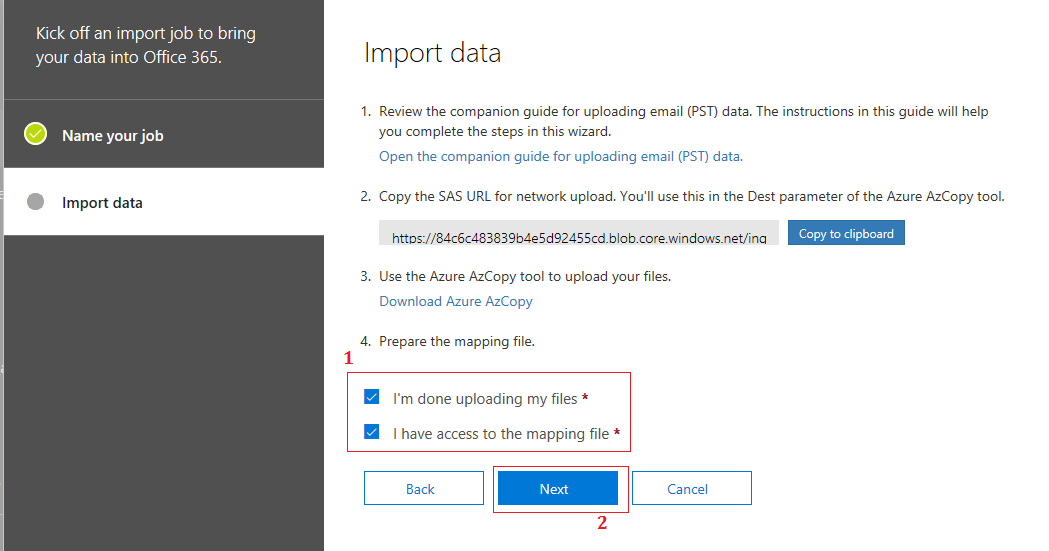
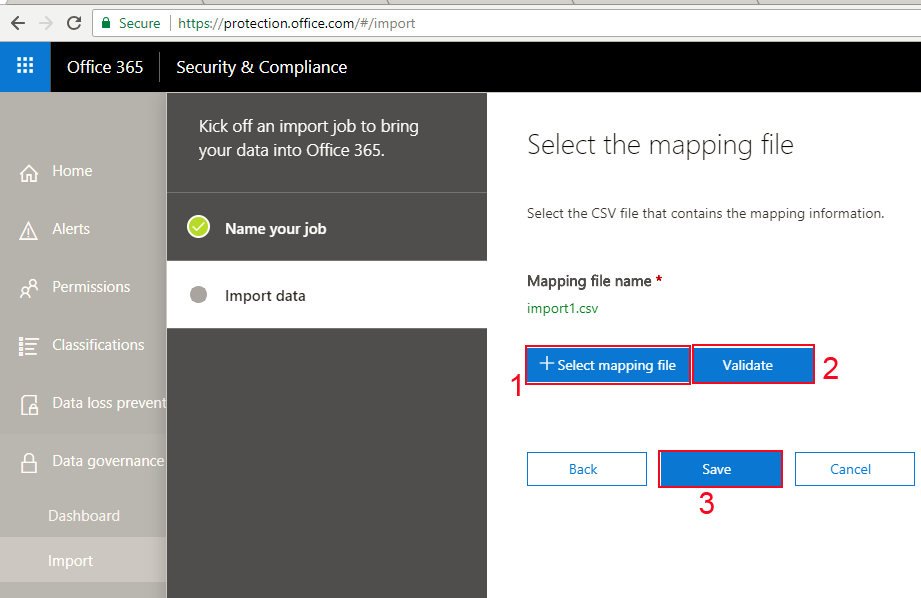
Step 8: After that, a window will open then click Select mapping file and upload the CSV. Once it uploads hit on validate for validating>> Save.
Now you will see that the PST file successful migrate into Office 365.
Method 2: Use the third-party tool to convert PST into o365
Here I am explaining one more process which is the third-party software. All the third-parties solution is trying to make easy the migration. There are many solutions available so it is important to choose a real application. That’s why I am recommending you MailsDaddy PST to Office 365 Migration Tool. With this software, you can export the multiple PST files into multiple O365 Mailboxes. This is the GUI based application and with this software, you don’t need any PowerShell or Azure Commands.
Why the MailsDaddy PST to Office 365 Migration Tool? :
This is the best application for moving the whole PST file data like emails, contacts, calendars, appointments, tasks, and attachments into Exchange Online environment within a few clicks. It has many different features from other software.
Export the selected data: The application migrate only the selected PST file and you can also select the mails by the name, subject, email id, and the particular time period.
Date Range Filter: With this feature, you can Import a particular date to date PST items into o365 Mailbox.
Bulk and Impersonation Option: In this tool, you can convert your multiple PST files into Multiple Exchange Online accounts with the BULK or Impersonation Export Button. For this feature, you need to create the CSV file and in the impersonation Export option, the users need to give the applicationimpersonation permission or full access for the Admin account.
Pause or Resume feature: This is the best feature of the software. With this feature, you can Pause the importing process and continue at the same place by clicking Resume.
Conclusion: In this article, I discuss how to Export or Migrate MS Outlook PST to Office 365 Cloud Mailbox. Here I also explained two possible methods one is manual and another is a third-party tool. You can use any one of the accounting to your requirement. If you still have any problem, then leave a message on the comment. It will be my opportunity to help you.