Impersonation permission in Office 365 allows a service to perform tasks related to the impersonation account of the user account. Impressions are the best option for handling or accessing the service account for each mailbox in the database when you are working with multiple mailboxes.
Here we are going to discuss how to grant the application impersonation rights for the user’s mailbox in o365 cloud mailbox. So follow all the step by step solution for setting up impersonation rights in Office 365.
Method 1: Set-up Application Impersonation Rights in Exchange Online with admin portal
This feature is available in Office 365 Enterprise 3 License or Exchange Server 2007 and above. Now follow all the steps to allow the impersonate rights for the user’s account using the O365 administration portal.
Step 1: First login the Office 365 Admin Mailbox account.
Step 2: After that go to Exchange admin center by clicking Admin center>> Exchange.
Step 3: In the Exchange Admin Center window click permission >> + icon and then type the name & discretion in the new role group window >> + icon and select the Application Impersonation option >> Add >> Ok.
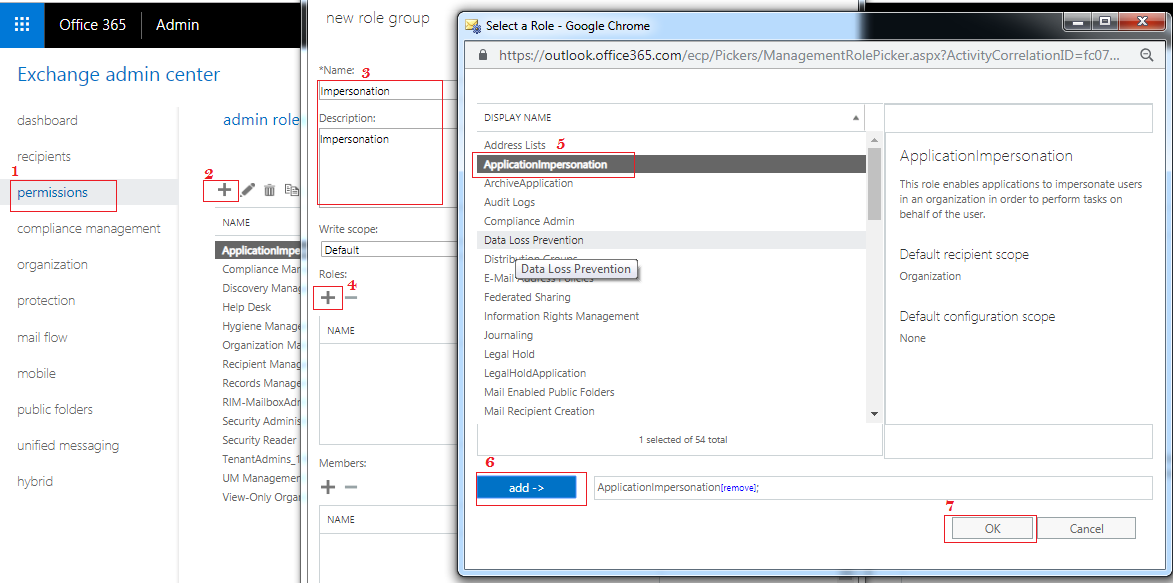
Step 4: Once you hit on ok you need to add the member. For the Adding the members just click on the + icon in the member option and select the user mailbox.

Step 5: After adding the member you need to save it.
Note: While you are using the PST to Office 365 Migration Tool and you want to use the Impersonate Export option then you need to provide the Full Access Permission to the Admin Account. To know it just follow all given step by step process.
With this given process you can provide the Full Access Permission to each mailbox.
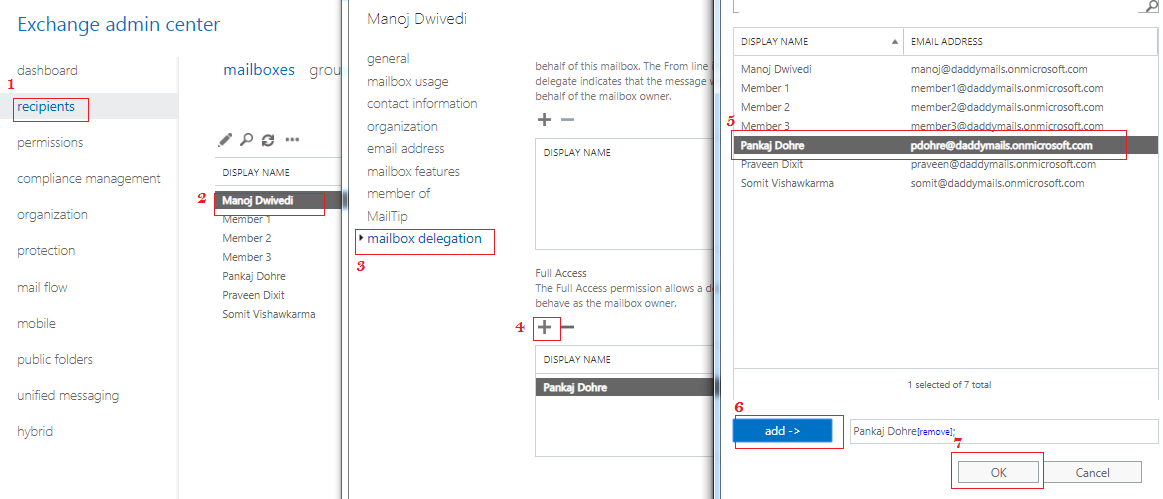
Full Access Permission for the Office 365 Administration Mailbox
Step 1: Login the o365 account and go to the Exchange Admin Center window and select the recipients then double click on the mailbox. After that go to Mailbox Delegation and provide full access to the Admin Mailbox then hit on save.
Method 2: Grant the Application Impersonation Rights in o365 using Windows PowerShell Command
Step 1: Launch the Windows PowerShell command as Administrator
Step 2: Connect the Exchange Online Mailbox with the PowerShell Remote session.
Step 3: Check whether the account is already impersonation rights by placing the following command.
Get-ManagementRoleAssignment -RoleAssignee "<account name>" -Role ApplicationImpersonation -RoleAssigneeType user
Where < account name> is the name of Admin Mailbox.
Step 4: For setting up the impersonate rights type.
New-ManagementRoleAssignment –Name:<impersonation Assignment Name> –Role:ApplicationImpersonation –User: "<account name>"
Here the < impersonation Assignments Name> means the name which one you select for the assignment and each assignment have a unique name.
Step 5: You can also remove the Impersonate rights if it necessary. For removing the Application impersonation rights you need to put the following commands.
Get-ManagementRoleAssignment -RoleAssignee "<account name>" -Role ApplicationImpersonation -RoleAssigneeType user | Remove-ManagementRoleAssignment
Conclusion: In this Article, I explained how to set-up the Application Impersonation Rights in Office 365 Exchange Online Mailbox. Here I also discuss two possible manual ways which are using Exchange Admin Center or using Windows PowerShell. If you still have any doubts then leave a message on the comment box.